Monday, December 8, 2008

Pathways Edges and Boundaries Final Walk Through


The final day came of our critique and we had to set out what concrete items we had made for our group. Mirage put out a quik-rete tube to show where our vertical poles would go when we installed them next semester. When we set our circles out we noticed that the designs we etched into them made a square when put together. Our group liked how this went with the overall island and decided to keep it.
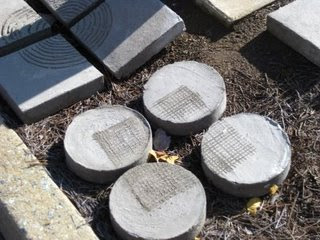
This is where our stepping stones will go when they are installed properly next semester.
We still have to make sure we level the ground and put appropriate ground cover before the concrete can be put there to stay.


Exhibit Group


I was also in another sub group which was the Exhibit group. That group had the fun time of taking everyones compiled work and displaying it in the lobby for all to see. It was a difficult task, but there was not another sub group I would have rather been in. Everyone was as determined as I was to make this display look great.
We put a datum line on the wall so when people walked through, their eyes knew where to go and there was not a confusion.
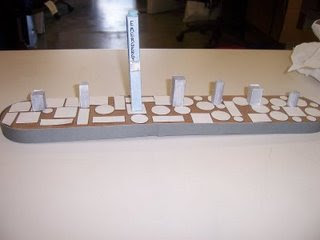
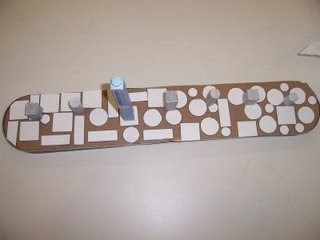
We also put it on the boards in the lobby as well for continuation. The boards were to create edges and boundaries, further using the concept in our presentation.


We put a pathway on the floor to play up our concept ideas.


We put our aggregate on display so everyone could see what different types of filler we went through before deciding on the perfect choice.


We also cut holes in the datum line paper to futher reitterate the pathways.


On the datum line on the wall, we hung a plan view of the site so that visitors could understand where we were putting our concrete items at.

We also needed a 3-D view of how our islands looked as a whole, so we set up a model.


Sunday, November 23, 2008

Time for Texture


About eight hours later the group met back to create texture in our stepping stones. The concrete was at a "green" state where it was still wet enough to carve texture into. We used wire brushes to etch the desired design into and then went back with tools (screw drivers, nails, matte knives) and carved the design in.


This is what the squares looked like after the carving took place

Pour Pour Pour!!!!


Next we cut out circles out of quik-rete tubes and duct taped wood together to make boxes and created our molds.


Then we all poured concrete like crazy in order to save time later on for other parts of the project.

It was a messy and long process but we got it done.


Saturday, November 22, 2008

Woodland Chapel


For class we had to draw the Woodland Chapel it was in (1/8":1') scale. I then had to double the measurements and put that into (1/4":1') scale.

From there we were to Poche either the inside or outside part of the house. Poche means to use different line weights to convey depth. I chose to poche the outside of the house.

Thursday, November 20, 2008

Conveying Depth

For Stoel's class we were to draw this house which was in (1/8":1') double that measurement and then draw that in (1/4":1')
Then we were to convey depth by using different line weights. As you can see the house is lighter line weight than the lawn.

Tuesday, November 18, 2008

Arrows and Scale Drawings

For the second part of Stoel's Class we were to draw ten north arrows and four different scales two times. I drew extra north arrows because I felt like mine were not professional enough looking. My favorite one is the one that says <--NORTH.

Orthographic/ 3-D views

These are the exercises we did for Stoel's class. We had to finish at least one side of the cube and then redraw the cube in 3-D. I went back and edited the ones that did not turn out too well.
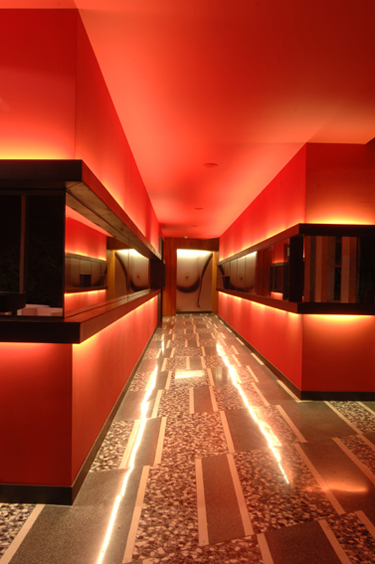


Concrete and Yet Another Idea


We then had to see what type of aggregate would be appropriate for our stepping stones in the island. We tried cat litter, but that idea was a failure.


So it was back to the drawing board again. In the mean time, our group met again and our design changed ones again as well.

We would not have enough time to pour concrete into who knows how many stepping stones for the island, not to mention even starting on all the vertical poles. We then moved on to a condenced island. This is the one i have been the most proud of. We decided to move the stepping stones to around the corners of the islands and also to the center to further excentuate the pole again. We would do just two vertical poles on the end where the rectangles would join around the edge, and put circles and squares together to make a moment around the pole as well.

Monday, November 17, 2008

Change of Plans

Our group had a huge problem in the middle of the project. We would not be able to build the structures in that short amount of time, not to mention our island looked nothing like the other groups either. We then selected a few people from each group to be a SUPER group, to decide what ideas would work and which ideas could not be used. All the groups needed to show progression throughout each island. We decided on circles and squares because of the circular and liniar forms in the surronding areas that the parking lot is in. There was also to be no color, solid walls, or lettering of any type. This completely wiped the Mirage groups slate clean.
Our group had to rethink what we wanted to achieve with the concrete and how we could play with circles and squares in our island. We looked to oasis and desert group for verticality heights so we could remain consistant with their groups. We also took into consideration how tall our pole was as well.

Our idea then became six pillars going in a pattern of circle square circle and have a progression of stepping stones in the island as well. The height of the pillars was like the other surrounding groups, but went up in height eventually reaching the talk button on the pillar. This was to draw a persons eye to the light pole.

Group Meetings New Ideas

After our group met for the first time it was rough getting everyones ideas incorporated into the entire project. The question was what can we build with concrete without obstructing the emergency pole? We came up with three structures reading art on the left and four structures reading IARC on the right. We also came up with a new name for our island which was Mirage. The concept was the idea of illusion. We wanted to create something that gave an illusion to the island. For instance Shadows. That is where our structures came into play.


After our group talked again we decided that the path to the pole was obstructed too much and to create a pathway.


We took the structures and basically pulled them apart so the look was the same but there was a path to the pole.

Wednesday, November 12, 2008

Initial Idea For Waystation


After looking at some precendents I came up with a few of my own ideas for the island. I looked at the pathway between the cars and also to the pole. I set up two concrete walls with open areas in between to let the light reflect onto the ground to create more shadowing. Then I put pavers on the ground with recycled glass chips in them to reflect the sunlight. The curves of the wall was to simulate water. There is also a clear path from the parking spaces to the other side of the island.

Tuesday, November 11, 2008

Gatewood Studio Arts Building


This is by far my most favorite picture I have ever drawn. It took me hours to accomplish, but it was all worth the time. I do not think that I have ever drawn this well, so the classes must be working. This picture was for the two vanishing points of an exterior of a building. This particular building is the Gatewood Studio Arts Building that all Interior Architecture classes occur. It is one of my favorite buildings on campus.

Enhanced Bottles


This assignment was to find a picture with enhanced lighting. I picked a picture of three perfume bottles for mine. It was pretty hard find the vanishing point on these, but I am happy with the result

Things Are Looking Up

For Nadia's class we were to take four pictures in either one point or two point perspective. This is one I did looking up at the old J.P building in downtown Greensboro. The right side of the building turned out pretty well but the left I had to keep going back and fixing over and over. I still might go back again and try to fix the top part of the picture. Then again I may do more harm then good to it. 

Monday, November 10, 2008

Friday, November 7, 2008

Starting Pathways Edges and Boundaries


For studio our group was the "waystation". Our island is located in the middle between desert and the oasis group. We have a large emergency pole located in our island. So the first thing that came to mind when I was initially looking at the island was that whatever we put out here could not block the pole. Another thing that I noticed was that the emergency light cast a really neat shadow on the ground when it was sunny out. Thus leading to precedents for our island.
I noticed that our pole looked a lot like the washington monument when it cast the shadow. That helped me think up ideas of maybe simulating water on our wall and playing with the light and shadow idea that was already existing.

Thursday, October 30, 2008

Hopes Desk in One Point Perspective

This is a picture of Hope Talley's desk in one point perspective. This one is my second attempt. I feel by the second time I got the hang of it.

Two Point of my desk

Here is the final outcome of my desk in two point perspective. After a few tries I think I mostly got the hang of it
This Is the second attempt at the desk
This is the first attempt at two point perspective of my desk