Showing posts with label Studio. Show all posts

Monday, December 8, 2008

Pathways Edges and Boundaries Final Walk Through


The final day came of our critique and we had to set out what concrete items we had made for our group. Mirage put out a quik-rete tube to show where our vertical poles would go when we installed them next semester. When we set our circles out we noticed that the designs we etched into them made a square when put together. Our group liked how this went with the overall island and decided to keep it.
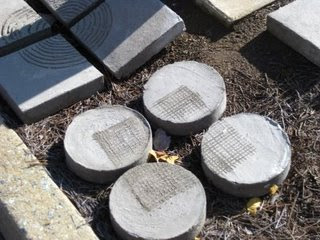
This is where our stepping stones will go when they are installed properly next semester.
We still have to make sure we level the ground and put appropriate ground cover before the concrete can be put there to stay.


Exhibit Group


I was also in another sub group which was the Exhibit group. That group had the fun time of taking everyones compiled work and displaying it in the lobby for all to see. It was a difficult task, but there was not another sub group I would have rather been in. Everyone was as determined as I was to make this display look great.
We put a datum line on the wall so when people walked through, their eyes knew where to go and there was not a confusion.
We also put it on the boards in the lobby as well for continuation. The boards were to create edges and boundaries, further using the concept in our presentation.


We put a pathway on the floor to play up our concept ideas.


We put our aggregate on display so everyone could see what different types of filler we went through before deciding on the perfect choice.


We also cut holes in the datum line paper to futher reitterate the pathways.


On the datum line on the wall, we hung a plan view of the site so that visitors could understand where we were putting our concrete items at.

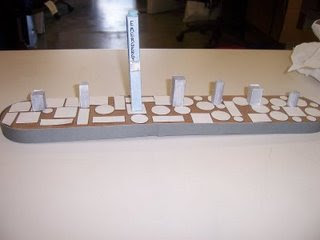
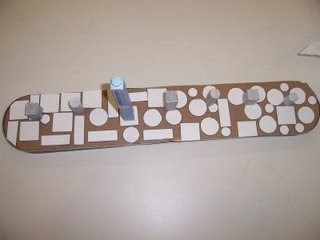
We also needed a 3-D view of how our islands looked as a whole, so we set up a model.


Sunday, November 23, 2008

Time for Texture


About eight hours later the group met back to create texture in our stepping stones. The concrete was at a "green" state where it was still wet enough to carve texture into. We used wire brushes to etch the desired design into and then went back with tools (screw drivers, nails, matte knives) and carved the design in.


This is what the squares looked like after the carving took place

Pour Pour Pour!!!!


Next we cut out circles out of quik-rete tubes and duct taped wood together to make boxes and created our molds.


Then we all poured concrete like crazy in order to save time later on for other parts of the project.

It was a messy and long process but we got it done.


Tuesday, November 18, 2008

Concrete and Yet Another Idea


We then had to see what type of aggregate would be appropriate for our stepping stones in the island. We tried cat litter, but that idea was a failure.


So it was back to the drawing board again. In the mean time, our group met again and our design changed ones again as well.

We would not have enough time to pour concrete into who knows how many stepping stones for the island, not to mention even starting on all the vertical poles. We then moved on to a condenced island. This is the one i have been the most proud of. We decided to move the stepping stones to around the corners of the islands and also to the center to further excentuate the pole again. We would do just two vertical poles on the end where the rectangles would join around the edge, and put circles and squares together to make a moment around the pole as well.

Monday, November 17, 2008

Change of Plans

Our group had a huge problem in the middle of the project. We would not be able to build the structures in that short amount of time, not to mention our island looked nothing like the other groups either. We then selected a few people from each group to be a SUPER group, to decide what ideas would work and which ideas could not be used. All the groups needed to show progression throughout each island. We decided on circles and squares because of the circular and liniar forms in the surronding areas that the parking lot is in. There was also to be no color, solid walls, or lettering of any type. This completely wiped the Mirage groups slate clean.
Our group had to rethink what we wanted to achieve with the concrete and how we could play with circles and squares in our island. We looked to oasis and desert group for verticality heights so we could remain consistant with their groups. We also took into consideration how tall our pole was as well.

Our idea then became six pillars going in a pattern of circle square circle and have a progression of stepping stones in the island as well. The height of the pillars was like the other surrounding groups, but went up in height eventually reaching the talk button on the pillar. This was to draw a persons eye to the light pole.

Group Meetings New Ideas

After our group met for the first time it was rough getting everyones ideas incorporated into the entire project. The question was what can we build with concrete without obstructing the emergency pole? We came up with three structures reading art on the left and four structures reading IARC on the right. We also came up with a new name for our island which was Mirage. The concept was the idea of illusion. We wanted to create something that gave an illusion to the island. For instance Shadows. That is where our structures came into play.


After our group talked again we decided that the path to the pole was obstructed too much and to create a pathway.


We took the structures and basically pulled them apart so the look was the same but there was a path to the pole.

Wednesday, November 12, 2008

Initial Idea For Waystation


After looking at some precendents I came up with a few of my own ideas for the island. I looked at the pathway between the cars and also to the pole. I set up two concrete walls with open areas in between to let the light reflect onto the ground to create more shadowing. Then I put pavers on the ground with recycled glass chips in them to reflect the sunlight. The curves of the wall was to simulate water. There is also a clear path from the parking spaces to the other side of the island.

Friday, November 7, 2008

Starting Pathways Edges and Boundaries


For studio our group was the "waystation". Our island is located in the middle between desert and the oasis group. We have a large emergency pole located in our island. So the first thing that came to mind when I was initially looking at the island was that whatever we put out here could not block the pole. Another thing that I noticed was that the emergency light cast a really neat shadow on the ground when it was sunny out. Thus leading to precedents for our island.
I noticed that our pole looked a lot like the washington monument when it cast the shadow. That helped me think up ideas of maybe simulating water on our wall and playing with the light and shadow idea that was already existing.

Thursday, October 23, 2008

Dialog Project Critique

For the Dialogue project, our class had to create dialogue with 12 (4”x6”) planes of Bristol board and 12 (12”) skewers. In the critique we were asked many questions about dialogue and how we applied it in our project. The first question was how was dialogue created? Some designers had two identical spaces and were adjacent to one another. Others, however, had different looking spaces on two different planes. For my project the spaces are placed adjacent even though they are placed off center with one another. The next question was how is the sense of space/place defined? Tommy had the perfect answer to that one: “ When the space is relative to the scale it becomes a clearly defined space” For instance my project has tiny spaces between each plane of Bristol board, and one big open space in the middle. It is understood that those spaces are there, but as for a usable space, the tiny “spaces” are not useful. The idea of a system being generated is the way rods and planes come together to create a space or “system”. The fourth question was how does joinery support the concept/strategies? It is the way the skewers come together to form the joint. Some utilized this by gluing, binding, bending, splitting, or placing the cards/rods together to form a specific joint. Scale was utilized in the project, by enhancing the design of the projects space. Scale is about relativity; comparing spaces to one another. We must do this either intuitively or objectively. The scale when it becomes bigger defines a sense of space. How do two-dimentional images add to the understanding of the project was the next question. Drawings show detail that sometimes models do not show. They can show where spaces specifically are. With drawings we can subtract things out to give a better understanding, whereas models cannot do that. Finally, the last question was how did the initial project evolve? Some designers used previous models or precedents. These can evolve into the final outcome. My project I started out with a precedent and the first model allowed me to see what I needed to do for the next. My final is the outcome of the previous models.

Creating Dialog

For the Dialog project we had to create two spaces for of our project using 12 skewers and 12 (4"x6") planes of bristol board.


For my first model I put 3 pieces of bistol board on the front and three on the back and sandwiched the skewers in between. Then i used the remaining bristol board and curved the planes in between the two structures. This did not create a clear dialog and I was not happy with the outcome ove the overall look. There was not two clear spaces, there was many more than that.


The curves worked well and i wanted to keep that same idea going in the next model so I sandwiched the skewers again only this time I put the curves along the bottom and gave the piece a bottom to sit on giving it a curved look. The only problem was that It did not give enough explaination to where the two spaces were. If they were moved up it became one space. So it was on to another idea.


Keeping the curved idea going I curved the planes back on one another and allowed the skewers to pierce through the planes creating a domed look to it. The spaces in between each plane were small enough to you would not consider them an actual place. The centers of the curves of each one gives a clearly defined space. The dialog that I created was like two strangers meeting and conversating. At first its jagged and akward for the two people. However, as the conversation moves on both become more relaxed and calm so there can be an open dialog. When the conversation is over it is more smooth and slowly breaks off. That is where the skewers come together at the ends.


Saturday, October 11, 2008

Unity Project


For this project we were to use 12 bamboo skewers and 12 (4"x6") planes of bristol board and make anything we wanted out of those. The only exception to the rule was that we could not cut the bristol board and we could not change the color of any of the objects.
My first model was to make circles and curve the remaining paper into each individual circle. Two  rods pierced the planes and the rest fell into place between the five circles and curves. The problem with this was there was two planes of bristol board left over and nowhere for them to go.


Next I used six pieces of Bristol board to create the circles and hot glued the ends together. Then I curved the planes on each side of the circles and in doing so that used up all of the planes. Next was the skewers. I liked the triangle shape that the first unity project had on its side. So I mimicked the same structure only this time paying attention to where the skewers hit.  The only problem with this model, was that it was not level with the table and rocked. 


This was my next itteration of the unity project. Tommy suggested using vellum, which I tried. I did not think that was following the rules, so I decided to go back to the white bristol board. This project I made sure was level with each side of the skewers. 


For this last Unity model I used everything that I had learned with the previous ones and made sure that the highest craft level was used. The circles and each space in between them are evenly spaced apart making unity throughout the project. The curves and straight planes are opposite but in this model they compliment one another creating a beautiful proximity with each other. 


Tuesday, October 7, 2008

Oh Compare!


My project for studio most resembled Young Moons unity project. My Unity project is the first one and Young's are the following two. My Unity project has lots of circles with in circles and is pierced by skewers. Young's project is three circles stacked and has skewers puncturing through them. The inside view of his project shows the inner circles that mine has as well. Furthermore, when the project is laid on its side there is spot where the sticks cross over one another that my project has as well. The touching of each stick to one another further shows the unity of the circles to the overall project that mine shares with Young's. The inside of the circles is like mine because when you look inside of the circles you can see the moment where the skewers pierce the circles.


The proximity around the skewers and the paper is more than mine because mine has triangles holding mine together. On some sides of Young's project the circles are being pierced with three skewers. Whereas, my project only has two places where that occurs. Also, my project has a repeating pattern of circles and skewers together, and youngs does not repeat any similair pattern with the skewers as mine does.

Saturday, October 4, 2008

Dome Dome Dome The end


The Final Product!!!!!! This is my final look of my 12 Twig Project. I kept the same circular twigs, but refined the other circles to rafia and wire. This way the wire and paper were more a part of the project. On the last model the brown blended in with the twigs and you could not see which was which. For this final model the pink compliments the green. Another change was the use of a binding agent. The wire is wrapped by the rafia making the structure more sturdy. Overall I am very happy with how the structure turned out.

Follow me to steps 2 and 3

This was my second attemt at the domed place for twelve twigs. I made the bottom more circular and used rafia and hot glue to hold the twigs together. This time the dome shape was more pronounced. I knew for the next one I wanted to use the same dome concept but change the twigs, because I had come up with a new idea. 
This is where the circles came in. The green is the twigs and the brown is twirled up brown paper. They are both held together with hot glue. I loved the idea of the circles, but the structure wasn't holding together. Furthermore, the hot glue had no other purpose besides holding it together. I knew for my final I had to make the twelve twigs sturdier and the bonding agent a part of the entire project.


All ideas have to have a start


This was my first model for the 12 twigs project. The project was to find 12 twigs and using only paper and one bonding agent make a place for all twelve. I knew I wanted to start out with a dome shaped figure and this was a rough idea of that. The pink and green rafia was used for the binding as well as the paper. The pink look was for it to be flowing pieces of ribbon caught in the dome.

Wednesday, September 17, 2008

Theory Hour

Today in Theory hour John Linn came in to speak to us about Sustainability and Architecture 2030. The PowerPoint started with a slide about fish and “if we were fish what would we see?” He stressed that how we affect the overall environment and how it can even be seen by creatures that aren’t even in our own species. Linn then explained that the human race is a storm. That just like a storm, our race is destroying the Earth. We destroy our path and then we construct again. Humans are a dynamic agent of transformation. There is no destruction without construction.  That we do so much damage, yet we are not even a place or even a thing.

Linn concluded his speech by telling us about our carbon footprint.  The twenty-thirty challenge was created to measure the carbon footprint being left each year by the human race and what we can do to slow it down. . The challenge is to get buildings to give off no carbon releases and be neutral by year 2030. Organizations named LEED and AIA were designed to find alternate energy sources besides carbon. LEED stands for Leadership Environmental Energy Design. They set target goals to change carbon usage by 50% right now and then 10% every year following that.  Linn said that buildings need to be able withstand time and not be locked into its energy source. Instead, to change like we do. 

What I Learned About the 12 Twigs Critique

Today on Wednesday September 17th, Interior Architecture had a critique on our place for twelve twigs project. In that critique we discussed strategic thinking and our issues in general.
The strategic thinking involved lots of things to think about when creating my project. One issue was our focus on the project. If we had lots of variety in our projects, we should reduce the amount of things going on and as Tommy put “emphasize what we aim to emphasize.” If the project had lots happening, our eyes didn’t know where to focus, which ended up taking away from the project.

Another topic was the class’s issues in general, as in scale and visualization. Our scale of how the project related to the size of the twigs was a problem in most cases. Some projects size took away from the twigs, which were the star of our projects. Another key issue in scale was color. The color we used needed either to contrast greatly or to compliment the twigs. With Visualization our pattern and form had to be exact as well. Again, make our eyes go to where the designer wanted.

Overall, I learned that making more projects never hurt. As for my project, I learned I should experiment with color and possibly with the size to create a place for my unique twelve twigs.

Monday, September 15, 2008

Same is the name


Our assignment in studio was to find a structure that looked like our twig project the most. For my project the structure that i am building is in a dome shape with connections with Rafia. These structures are similair because of the connections and the same dome shape. The first picture made out of willow has the same woven shape as both the twig and the rafia.

Saturday, September 13, 2008

A place for a Leaf


These pictures are my leaf project from start to finish. The leaf project was to create a "place" for our leaf using ONLY paper. The models are from what I started out with and then the modifications. My leaf is a brown magnolia leaf that I found in front of the Studio Arts Building. It looked out of place since it was summer and dead leaves to me belong in the winter. Hence the snowflakes. That was too literal, so I went back and thought of some other ideas with the same "tower" look to my place as before. I tried cutting slits in the side and also tearing it to mimick the tear in the leaf.  All the detail in those took away from the leaf and put focus on the place. Not to mention the color of the sketch models took away from the leaf as well. So, it was back to the drawing board. 

The original leaf ended up breaking to pieces, thus, I had to build another to fit the new leaf.  I found a similar leaf and cut two slits in each side of the tower and one at the base and came up with a new concept. I used a green paper to contrast the brown leaf, and the final concept was it fell in the woods and the light it cast was the sun through the branches. I was really happy with how the place turned out.